
নোড এর বিষয়বস্তু উন্নত করতে চান? একটি সম্পাদনা অনুরোধ করার চেষ্টা করুন.
In the digital age, your keyboard is your primary tool for communicating, creating, and working. Yet, many people still rely on the inefficient, exhausting "hunt-and-peck" method—using only two or three fingers while constantly looking down. The provided chart illustrates the ultimate solution: Touch Typing. This technique uses muscle memory, not sight, to locate keys, allowing you to type quickly, accurately, and comfortably using all ten fingers. This article is your roadmap to mastering this essential skill.
Part 1: How to Use the Keyboard Fingering Chart
The chart isn't just a colorful diagram; it’s a detailed instruction set for hand placement.
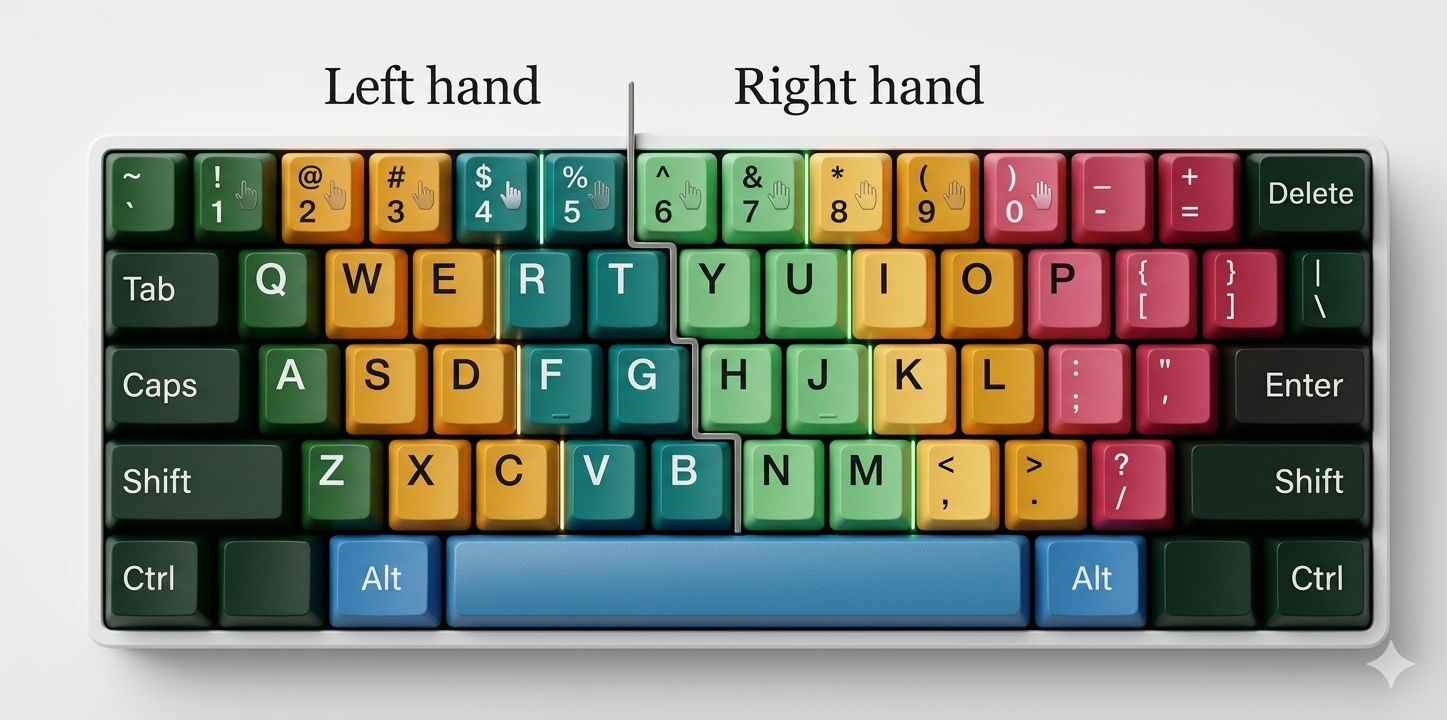
1. The Divine Divide
A central, jagged line separates the keyboard. This tells you definitively which hand is responsible for which keys.
- Keys to the left of the line must only be typed by your left hand.
- Keys to the right of the line must only be typed by your right hand.
2. Finger Coding
Within each hand, distinct color bands are assigned to specific fingers. This is the heart of muscle memory. While the standard names aren't on the chart, the concept is universal:
| Chart Color Band | Standard Finger Assignment | Motion Range Example |
|---|---|---|
| Pink(Peripheral) | Left Pinky / Right Pinky | Tab,Q,A,Z,Ctrl,;,',Enter,Shift,Delete |
| Amber/Yellow | Left Ring / Right Ring | 2,W,S,X,0,O,L,. |
| Teal/Blue | Left Middle / Right Middle | 3,E,D,C,9,I,K,, |
| Light Green(Central) | Left Index / Right Index | 4,R,F,V,5,T,G,B,6,Y,H,N,7,U,J,M,8 |
| Cerulean Blue(Bottom) | Thumbs | The Spacebarand sometimes Alt. |
Instruction: Study the chart until you know which color belongs to which finger. When you need to type the letter "D," your middle finger must automatically move there because "D" is in the blue/middle finger column.
Part 2: Step-by-Step Instructions to Begin Typing
Now that you understand the guide, here is how to put it into practice.
Step 1: Establish "Home Row" Position
Your fingers do not wander aimlessly. They rest on a specific row of keys called the Home Row.
- Left Hand: Place your pinky on
A, ring onS, middle onD, and index onF. - Right Hand: Place your index on
J, middle onK, ring onL, and pinky on;. - Find the Bumps: Almost all keyboards have small, raised bumps on the
FandJkeys. Your index fingers must learn to find these by feel alone. This is your "anchor."
Step 2: Form and Posture
Proper form prevents fatigue and injury.
- Curved Fingers: Keep your fingers gently curved, as if holding a tennis ball. Type with your fingertips, not the flat pads of your fingers.
- Hovering Wrists: Your wrists should be straight and hovering slightly above the keyboard—do not rest them on the desk or the laptop body. This allows your fingers to reach further without straining.
- Sit Up straight: Keep your back straight, elbows at a right angle, and look directly at your screen, not the keyboard.
Step 3: The Basic Stroke Sequence
Ten-finger touch typing can be summarized as:
- Start in the Basic (Home) Position.
- Reach to a key using the assigned finger only, guided by muscle memory.
- Press the key with gentle force.
- Immediately return that finger to its basic position on the home row.
Step 4: The Thumb Rules
Your thumbs are dedicated to the Spacebar and the Alt keys. Use either thumb to press the spacebar—most people develop a preference for one hand.
Part 3: The Hidden Benefits of Ten-Finger Typing
Learning touch typing requires patience, but the rewards are massive.
1. Immense Speed and Efficiency
A standard "hunt-and-peck" typist averages 27-37 words per minute (WPM). A practiced touch typist using all ten fingers easily achieves 40-60 WPM, and professionals often exceed 80+ WPM. You will save hours of your life every week.
2. superior Accuracy
By trusting muscle memory rather than looking back and forth between the screen and the keys, you make fewer mistakes. Furthermore, because you are looking at the screen, you will notice and correct errors as they happen.
3. Better Health and Comfort
Hunt-and-peck typing forces you to slouch over your keyboard, straining your neck and back. Touch typing promotes proper, upright ergonomic posture, significantly reducing the risk of repetitive strain injuries like carpal tunnel syndrome.
4. Frees Your Mind
When typing becomes automatic, your brain doesn’t have to waste cognitive energy finding the letter "T". You can dedicate 100% of your focus to the content—drafting emails, coding algorithms, or writing your novel.
Part 4: More Tips for Success
- Don't Look Down! This is the hardest rule to follow, but the most important. If you look down, you are not training your muscle memory. Cover your hands with a towel if you are tempted.
- Prioritize Accuracy over Speed. Speed naturally builds with practice. If you try to type too fast too soon, you will only learn bad habits. Focus on getting the correct finger to the correct key every time.
- Short, Regular Practice is Key. Dedicated practice for 15 minutes a day is far more effective than an occasional two-hour session. There are many free online typing tutors that can provide structured drills.
- Practice with Real Texts. Once you know the key locations, practice by typing real articles, emails, or passages from books. This translates drills into real-world skill.
1
0
0
0

মন্তব্য